|
OGRE
2.2.4
Object-Oriented Graphics Rendering Engine
|
|
OGRE
2.2.4
Object-Oriented Graphics Rendering Engine
|
The HLMS (often stylized Hlms) is the new material system used in Ogre 2.0. It's more user friendly and performs faster.
HLMS stands for "High Level Material System", because for the user, the HLMS means just define the material and start looking at it (no need for coding or shader knowledge!). But on retrospective, tweaking the shader code for an HLMS is much low level than the old Materials have ever been (and that makes them very powerful).
Viewports now contain information about the scissor rectangle. Back in Ogre 1.x; Direct3D 9's support for scissor testing was optional, which caused lots of headaches. As a result, users could only use low-level function RenderSystem::setScissorTest for manually manipulating the scissor rect.
In OpenGL, it was even messier because setting and enabling the scissor rect was needed to perform buffer clears on partial regions of the framebuffer; which could override user's manual input, potentially breaking applications that worked fine using Direct3D.
Fortunately, all targetted APIs by Ogre 2.0 support scissor tests, and thus it is now properly supported. As a result:
Viewport::setScissors)RenderSystem::setScissorTest was removed.RSC_SCISSOR_TEST flag was removed.Described in detail in the Blocks section, many parameters have been grouped into blocks. Changing depth checks means changing the whole Macroblock.
You could be thinking the reason I came up with these two is to fit with D3D11′s grand scheme of things while being compatible with OpenGL. But that's a half truth and an awesome side effect. I've been developing the Hlms using OpenGL this whole time.
An OpenGL fan will tell you that grouping these together in single call like D3D11 did barely reduces API overhead in practice (as long as you keep sorting by state), and they're right about that.
However, there are big advantages for using blocks:
hash |= (macroblock->getId() << bits) & mask than to do: hash =| m->depth_check | m->depthWrite << 1 | m->depthBias << 2 | m->depth_slope_bias << 3 | m->cullMode << 18 | ... ; We also need a lot more bits we can't afford. Ogre 2.0 imposes a limit on the amount of live Macroblocks you can have at the same time; as we run out of hashing space (by the way, D3D11 has its own limit). It operates around the idea that most setting combinations won't be used in practice.Of course it's not perfect, it can't fit every use case. We inherit the same problems D3D11 has. If a particular rendering technique relies on regularly changing a property that lives in a Macroblock (i.e. like alternating depth comparison function between less & greater with every draw call, or gradually incrementing the depth bias on each draw call); you'll end up redundantly changing a lot of other states (culling mode, polygon mode, depth check & write flags, depth bias) alongside it. This is rare. We're aiming the general use case.
These problems make me wonder if D3D11 made the right choice of using blocks from an API perspective, since I'm not used to driver development. However from an engine perspective, blocks make sense.
Let me get this straight: You should be using the HLMS. The usual "Materials" are slow. Very slow. They're inefficient and not suitable for rendering most of your models.
However, materials are still useful for:
Under the hood there is an HLMS C++ implementation (HLMS_LOW_LEVEL) that acts just as a proxy to the material. The HLMS is an integral part of Ogre 2.0, not just a fancy add-in.
Materials have been refactored, and thus your old code may need a few changes. Most notably Macroblocks & Blendblocks have been added to Materials, thus functions like Pass::setDepthCheck & Co have been replaced by a two calls: Pass::setMacroblock & Pass::setBlendblock.
With FFP being removed, multitexturing and pass splitting functionality was cut as well. The HLMS default systems handle these.
AutoParamsSource here. Want the view matrix? You better grab it from the camera when the scene pass is about to start, and then pass it yourself to the shader. This is very powerful, because in D3D11/GL3+ you can just set the uniform buffer with the view matrix just once for the entire frame, and thus have multiple uniforms buffers sorted by update frequency. Very advanced user will be using messing with this part.Based on your skillset and needs, you can pick up to which parts you want to mess with. Most users will just use the scripts to define materials, advanced users will change the template, and very advanced users who need something entirely different will change all three.
For example the PBS (Physically Based Shading) type has its own C++ implementation and its own set of shader templates. The Toon Shading has its own C++ implementation and set of shaders. There is also an "Unlit" implementation, specifically meant to deal with GUI and simple particle FXs (ignores normals & lighting, manages multiple UVs, can mix multiple texture with photoshop-like blend modes, can animate the UVs, etc)
It is theoretically possible to implement both Toon & PBS in the same C++ module, but that would be crazy, hard to maintain and not very modular.
We're introducing the concept of blocks, most of them are immutable. Being immutable means you can't change the Macro- Blend- & Samplerblocks after being created. If you want to make a change, you have to create a new block and assign the new one. The previous one won't be destroyed until asked explicitly.
Technically on OpenGL render systems (GL3+, GLES2) you could const_cast the pointers, change the block's parameters (mind you, the pointer is shared by other datablocks, so you will be changing them as well as side effect) and it would probably work. But it will definitely fail on D3D11 render system.
A Datablock is a "material" from the user's perspective. It is the only mutable block. It holds data (i.e. material properties) that will be passed directly to the shaders, and also holds which Macroblock, Blendblocks and Samplerblocks are assigned to it.
Most Hlms implementations will create a derived class for Datablocks to hold their data. For example, HlmsPbs creates a datablock called HlmsPbsDatablock. This datablock contains roughness and fresnel values, which do not make any sense in (e.g.) a GUI implementation.
Named like that because most entities end up using the macroblock. Except for transparents, we sort by macroblock first. These contain information like depth check & depth write, culling mode, polygon mode (point, wireframe, solid). They're quite analogous to D3D11_RASTERIZER_DESC. And not without reason: under the hood Macroblocks hold a ID3D11RasterizerState, and thanks to render queue's sorting, we change them as little as possible. In other words, reduce API overhead. On GL backends, we just change the individual states on each block change. Macroblocks can be shared by many Datablocks.
Even in OpenGL, there are performance benefits, because there are enumeration translations (i.e. CMPF_LESS -> GL_LESS) that are performed and cached when the macroblock gets created, instead of doing it every time the setting changes.
Blendblocks are like Macroblocks, but they hold alpha blending operation information (blend factors: One, One_Minus_Src_Alpha; blending modes: add, substract, min, max. etc). They're analogous to D3D11_BLEND_DESC. We also sort by blendblocks to reduce state changes.
Samplerblocks hold information about texture units, like filtering options, addressing modes (wrap, clamp, etc), Lod bias, anisotropy, border colour, etc. They're analogous to D3D11_SAMPLER_DESC.
GL3+ and D3D11 both support samplerblocks natively[^12]. On GLES2, the functionality is emulated (still performance has improved since we can cache the samplerblock's GL value translations and whether a texture has already set to a given samplerblock's paremeters).
The diagram shows a typical layout of a datablock. Note that Samplerblocks do not live inside base HlmsDatablock, but rather in its derived implementation. This is because some implementations may not need textures at all, and the number of samplerblocks is unknown. Some implementations may want one samplerblock per texture, whereas others may just need one.
Macroblocks and Blendblocks on the other hand, we just need one per material.
The Hlms will parse the template files from the template folder according to the following rules:
The Hlms takes a template file (i.e. a file written in GLSL or HLSL) and spits out valid shader code. Templates can take advantage of the Hlms' preprocessor, which is a simple yet powerful macro-like preprocessor that helps writing the required code.
The preprocessor was written with speed and simplicity in mind. It does not implement an AST or anything fancy. This is very important to account while writing templates because there will be cases when using the preprocessor may feel counter-intuitive or frustrating.
For example
is analogous to
However you can't evaluate IncludeLighting to anything other than zero and non-zero, i.e. you can't check whether IncludeLighting == 2 with the Hlms preprocessor. A simple workaround is to define, from C++, the variable "IncludeLightingEquals2" and check whether it's non-zero. Another solution is to use the GLSL/HLSL preprocessor itself instead of Hlms'. However the advantage of Hlms is that you can see its generated output in a file for inspection, whereas you can't see the GLSL/HLSL after the macro preprocessor without vendor-specific tools. Plus, in the case of GLSL, you'll depend on the driver implementation having a good macro preprocessor.
The preprocessor always starts with @ followed by the command, and often with arguments inside parenthesis. Note that the preprocessor is always case sensitive. The following keywords are recognized:
Checks whether the variables in the expression are true, if so, the text inside the block is printed. Must be finazlied with . The expression is case sensitive. When the variable hasn't been declared, it evaluates to false.
The logical operands && || ! are valid.
Examples:
It is very similar to #if hlms_skeleton != 0 #endif; however there is no equivalent #else or #elif syntax. As a simple workaround you can do:
Newlines are not necessary. The following is perfectly valid:
Which will print:
Loop that prints the text inside the block, The text is repeated count - start times. Must be finalized with @end.
scopedVar is a variable that can be used to print the current iteration of the loop while inside the block. i.e. @scopedVar will be converted into a number in the range [start; count)Newlines are very important, as they will be printed with the loop.
Examples:
| Expression | Output |
|---|---|
| @foreach( 4, n ) @n@end | 0 1 2 3 |
| @foreach( 4, n ) @n@end | 0 1 2 3 |
| @foreach( 4, n ) @n @end | 0 1 2 3 |
| @foreach( 4, n, 2 ) @n@end | 2 3 |
| @pset( myStartVar, 1 ) @pset( myCountVar, 3 ) @foreach( myStartVar, n, myCountVar ) @n@end | 1 2 |
| @foreach( 2, n ) @insertpiece( pieceName@n )@end | @insertpiece( pieceName0 ) @insertpiece( pieceName1 ) |
Attention #1!
Don't use the common letter i for the loop counter. It will conflict with other keywords.
i.e.
@foreach( 1, i )@insertpiece( pieceName )@endwill print0nsertpiece( pieceName )which is probably not what you intended.Attention #2!
foreach is parsed after property math (pset, padd, etc). That means that driving each iteration through a combination of properties and padd functions will not work as you would expect.
i.e. The following code will not work:
@pset( myVar, 1 )@foreach( 2, n )//Code@psub( myVar, 1 ) //Decrement myVar on each loop\@property( myVar )//Code that shouldn't be printed in the last iteration@end@endBecause psub will be evaluated before expanding the foreach.
Prints the current value of variable and increments it by 1. If the variable hasn't been declared yet, it is initialized to 0.
Examples:
Printes the current value of variable without incrementing it. If the variable hasn't been declared, prints 0.
Sets a variable to a given value, adds, subtracts, multiplies, divides, calculates modulus, or the minimum/maximum of a variable and a constant, or two variables. This family of functions get evaluated after foreach(s) have been expanded and pieces have been inserted. Doesn't print its value.
Arguments can be in the form @add(a, b) meaning a += b; or in the form @add( a, b, c ) meaning a = b + c
Useful in combination with @counter and @value
| Expression | Output | Math |
|---|---|---|
| @set( myVar, 1 ) @value( myVar ) | 1 | myVar = 1 |
| @add( myVar, 5 ) @value( myVar ) | 6 | myVar = 1 + 5 |
| @div( myVar, 2 ) @value( myVar ) | 3 | myVar = 6 / 2 |
| @mul( myVar, myVar ) @value( myVar ) | 9 | myVar = 3 * 3 |
| @mod( myVar, 5 ) @value( myVar ) | 4 | myVar = 9 % 5 |
| @add( myVar, 1, 1 ) @value( myVar ) | 2 | myVar = 1 + 1 |
Saves all the text inside the blocks and saves it as a named piece. If a piece with the given name already exists, a compiler error will be thrown. The text that was inside the block won't be printed. Useful when in combination with @insertpiece. Pieces can also be defined from C++ or collected from piece template files.
Trying to define a piece twice will result in error and may produce incorrect output.
Example:
Prints a block of text that was previously saved with piece (or from C++). If no piece with such name exists, prints nothing.
Example:
Undefines an existing piece, probably so you can override it with customizations. Note: undefpiece is parsed per file, before pieces from that file are collected, and its effects are global wide. It's only useful for undefining pieces defined in previous files.
If the piece is not defined, no error or warning is given. Parsing continues normally.
Example:
| Original_piece_vs.glsl | Overrider_piece_vs.glsl |
|---|---|
@piece( Hello )//Hello World@end @piece( VertexOut )@insertpiece( Hello ) outPos = vec4( 1.0, 1.0, 1.0, 1.0 ); @end | @undefpiece( Hello ) @piece( Hello )//Overriden@end |
| VertexShader_vs.glsl | Output |
|---|---|
void main() { @insertpiece( VertexOut ) } | void main() { //Overriden outPos = vec4( 1.0, 1.0, 1.0, 1.0 ); } |
Note that despite we already had Hello inserted inside VertexOut; and that we only overrode Hello (not VertexOut) and yet the final output showed the overriden Hello version.
Analogous to the family of math functions without the 'p' prefix. The difference is that the math is evaluated before anything else. There is no much use to these functions, probably except for quickly testing whether a given flag/variable is being properly set from C++ without having to recompile.
i.e. If you suspect hlms_normal is never being set, try @pset( hlms_normal, 1 )
One important use worth mentioning, is that variables retain their values across shader stages. First the vertex shader template is parsed, then the pixel shader one. If 'myVal' is 0 and the vertex shader contains ( myVal ); when the pixel shader is parsed ( myVal ) will return 1, not 0.
If you need to reset these variables across shader stages, you can use pset( myVal, 0 ); which is guaranteed to reset your variable to 0 before anything else happens; even if the pset is stored in a piece file.
There are two components that needs to be evaluated that may affect the shader itself and would need to be recompiled:
When calling Renderable::setDatablock(), what happens is that Hlms::calculateHashFor will get called and this function evaluates both the mesh and datablock compatibility. If they're incompatible (i.e. the Datablock or the Hlms implementation requires the mesh to have certain feature. e.g. the Datablock needs 2 UV sets bu the mesh only has one set of UVs) it throws.
If they're compatible, all the variables (aka properties) and pieces are generated and cached in a structure (mRenderableCache) with a hash key to this cache entry. If a different pair of datablock-mesh ends up having the same properties and pieces, they will get the same hash (and share the same shader).
The following graph summarizes the process:
Later on during rendering, at the start each render pass, a similar process is done, which ends up generating a pass hash instead of a renderable hash. Pass data stores settings like number of shadow casting lights, number of lights per type (directional, point, spot).
While iterating each renderable for render, the hash key is read from the Renderable and merged with the pass' hash. With the merged hash, the shader is retrieved from a cache. If it's not in the cache, the shader will be generated and compiled by merging the cached data (pieces and variables) from the Renderable and the Pass. The following graph illustrates the process:
Note: This section is relevant to those seeking to write their own Hlms implementation.
C++ can use Hlms::setProperty( "key", value ) to set "key" to the given value. This value can be read by \@property, @foreach, @add/sub/mul/div/mod, @counter, @value and @padd/psub/pmul/pdiv/pmod
To create pieces (or read them) you need to pass your custom Hlms::PiecesMap to Hlms::addRenderableCache.
The recommended place to do this is in Hlms::calculateHashForPreCreate and Hlms::calculateHashForPreCaster. Both are virtual. The former gets called right before adding the set of properties, pieces and hash to the cache, while the latter happens right before adding the similar set for the shadow caster pass.
In those two functions you get the chance to call setProperty to set your own variables and add your own pieces.
Another option is to overload Hlms::calculateHashFor which gives you more control but you'll have to do some of the work the base class does.
For some particularly complex features, the Hlms preprocessor may not be enough, too difficult, or just impossible to implement, and thus you can generate the string from C++ and send it as a piece. The template shader can insert it using .
The function Hlms::createShaderCacheEntry is the main responsible for generating the shaders and parsing the template through the Hlms preprocessor. If you overload it, you can ignore pieces, properties; basically override the entire Hlms system and provide the source for the shaders yourself. See the HlmsLowLevel implementation which overrides the Hlms entirely and acts as a mere proxy to the old Material system from Ogre 1.x; the flexibility is really high.
Properties starting with hlms_ prefix are common to all or most Hlms implementations. i.e. hlms_skeleton is set to 1 when a skeleton is present and hardware skinning should be performed.
Save properties' IdStrings (hashed strings) into constant as performance optimizations. Ideally the compiler should detect the constant propagation and this shouldn't be needed, but this often isn't the case.
For mobile, avoid mat4 and do the math yourself. As for 4x3 matrices (i.e. skinning), perform the math manually as many GLES2 drivers have issues compiling valid glsl code.
Properties in underscore_case are set from C++; propierties in camelCase are set from the template.
Propierties and pieces starting with custom_ are for user customizations of the template
TBD
Hlms supports modifying the template files externally and reloading them, taking immediate effect. Call Hlms::reloadFrom to achieve this. How to get notified when the files were changed is up to the user.
By default if a template isn't present, the shader stage won't be created. e.g. if there is no GeometryShader_gs.glsl file, no geometry shader will be created. However there are times where you want to use a template but only use this stage in particular scenarios (e.g. toggled by a material parameter, disable it for shadow mapping, etc.). In this case, set the property hlms_disable_stage to non-zero from within the template (i.e. using ) . The value of this property is reset to 0 for every stage.
Note that even when disabled, the Hlms template will be fully parsed and dumped to disk; and any modification you perform to the Hlms properties will be carried over to the next stages. Setting hlms_disable_stage is not an early out or an abort.
In many cases, users may want to slightly customize the shaders to achieve a particular look, implement a specific feature, or solve a unique problem; without having to rewrite the whole implementation.
Maximum flexibility can be get by directly modifying the original source code. However this isn't modular, making it difficult to merge when the original source code has changed. Most of of the customizations don't require such intrusive approach.
Note: For performance reasons, the listener interface does not allow you to add customizations that work per Renderable, as that loop is performance sensitive. The only listener callback that works inside Hlms::fillBuffersFor is hlmsTypeChanged which only gets evaluated when the previous Renderable used a different Hlms implementation; which is rare, and since we sort the RenderQueue, it often branch predicts well.
There are different levels in which an Hlms implementation can be customized:
ArchiveVec. The files in that folder will be parsed first, in order (archiveVec[0] then archiveVec[1], ... archiveVec[N-1]); which will let you define your own pieces to insert code into the default template (see the the table at the end). You can also do clever tricky things to avoid dealing with C++ code at all even if there are no custom_ pieces for it. For example, you can write the following code to override the BRDF declarations and provide a custom BRDF:HlmsListener. This allows you to have access to the buffer pass to fill extra information; or bind extra buffers to the shader.HlmsPbs. Useful for overriding only specific parts, or adding new functionality that requires storing extra information in a datablock (e.g. overload HlmsPbsDatablock to add more variables, and then overload HlmsPbs::createDatablockImpl to create these custom datablocks)HlmsPbs, HlmsPbsDatablock and the template.| Variable | Description |
|---|---|
| custom_passBuffer | Piece where users can add extra information for the pass buffer (only useful if the user is using HlmsListener or overloaded HlmsPbs. |
| custom_VStoPS | Piece where users can add more interpolants for passing data from the vertex to the pixel shader. |
| custom_vs_attributes | Custom vertex shader attributes in the Vertex Shader (i.e. a special texcoord, etc). |
| custom_vs_uniformDeclaration | Data declaration (textures, texture buffers, uniform buffers) in the Vertex Shader. |
| custom_vs_preExecution | Executed before Ogre's code from the Vertex Shader. |
| custom_vs_posExecution | Executed after all code from the Vertex Shader has been performed. |
| custom_ps_uniformDeclaration | Same as custom_vs_uniformDeclaration, but for the Pixel Shader |
| custom_ps_preExecution | Executed before Ogre's code from the Pixel Shader. |
| custom_ps_posMaterialLoad | Executed right after loading material data; and before anything else. May not get executed if there is no relevant material data (i.e. doesn't have normals or QTangents for lighting calculation) |
| custom_ps_preLights | Executed right before any light (i.e. to perform your own ambient / global illumination pass). All relevant texture data should be loaded by now. |
| custom_ps_posExecution | Executed after all code from the Pixel Shader has been performed. |
| custom_ps_uv_modifier_macros | PBS specific. Allows you to override the macros defined in Samples/Media/Hlms/Pbs/Any/UvModifierMacros_piece_ps.any so you can apply custom transformations to each UV. e.g. #undef UV_DIFFUSE #define UV_DIFFUSE( x ) ((x) * 2.0) |
| custom_ps_functions | Used to declare functions outside the main body of the shader |
This function gets called once per render_scene pass (note there can be multiple render_scene passes per frame) even if no Renderable actually uses your Hlms implementation.
In this function you can read the scene state and bake all the necessary data that will be shared for all the objects, like forward lights, shadow mapped lights, view and projection matrices, depth ranges, etc.
The function returns a cache + hash specific for the pass that will be merged with the Renderable's hash and the result will be used to compile the shader to be used.
This function gets executed for every Renderable that is going to be rendered. Implementations are meant to read the Renderable's data and fill their GPU data structures, like world matrix, bone matrices (if skeletally animated), set the textures. They can rely on parameters like lastCache and lastTextureHash to obtain information about the previously rendered object and avoid setting again many shared paremeters.
Before parsing the resources, i.e. before ResourceGroupManager::initialiseAllResourceGroups is called, you need to setup the proper Hlms.
Ogre is shipped with four implementations:
First need to create each implementation, specifying the location of the shader templates.
Notice that 'Archive' is a well known file system interface. Advanced users could use their own filesystem implementations and store template shaders in custom packed file formats (i.e. encrypted zip files).
Immediately afterwards, you will need to register the Hlms:
And that's it.
The function registerHlms accepts a boolean parameter named deleteOnExit which is true by default.
When true, Ogre will automatically call OGRE_DELETE hlmsPbs on shutdown (when unregisterHlms gets called) and most of the time you don't need to worry.
If you set this parameter to false, you will have to free the memory yourself after calling unregisterHlms. No renderable should be using any datablock created by that Hlms once it is destroyed; otherwise you will leave dangling pointers. On debug mode, Ogre will assert if it detects a Renderable using a datablock that is being destroyed.
Reasons for setting the parameter to false could include: the Hlms implementation lives in a different DLL and cannot be freed from OgreMain.dll; the Hlms implementation was allocated with a different allocator; you want to keep the Hlms alive even after unregistering, you like to do stuff manually, etc.
To create your own datablocks, you can use the following snippet, which will create a new datablock with default macroblock and blendblock parameters:
The last parameter, visibleToManager, specifies whether the HlmsManager will see this Hlms when asking for its name.
For example, both PBS and Unlit implementations may have a material named "Green". However only one can be visible to the manager; let's assume that the PBS one was made visible.
When you call Renderable::setDatablock( "Green" ), the HlmsManager will look the one that is visible to it. To assign the Unlit version of "Green" instead of the PBS one, you will have call the overload that specifies the pointer, and grab the datablock from the implementation itself: Renderable::setDatablock( hlmsUnlit->getDatablock( "Green" ) );
The function createDatablock allows two names: the hashed string and the human readable one. Most of the time you want them to be the same, but this isn't enforced. Note that the human readable name doesn't affect the functionality in any way. Its only purpose is to allow material editors and other GUIs based on Ogre to display the material's name; since IdString destroys the original string in Release mode.
HlmsParamVec is an array/vector of key-value string pairs to specify custom parameters on creation. Valid values depends on the implementation. You should see the Constructor's documentation for more information on them.
Most of the time optional, the Hlms uses its own texture manager to improve rendering performance.
Its main function is to pack texture together to reduce the amount of API overhead during rendering. The Hlms Texture Manager runs on top of the original TextureManager and is not meant to replace it.
On desktop, it will pack texture together using texture arrays. On mobile, it will use UV atlas instead. Ideally we would use bindless textures on desktop, however lack of D3D11 API (and D3D10 hardware) support for this feature makes this task very difficult.
By default, the manager will batch together all textures as they keep getting loaded.
The function HlmsTextureManager::createOrRetrieveTexture will first see if the texture has already been loaded. If it has, it will return the texture array or uv atlas; enclosed in the following structure:
The texture pointer is the actual atlas/array texture.
On Desktop, only xIdx is used, which indicates which slice in the array contains our texture.
In order to sample in the pixel shader, one needs to perform:
On Mobile, xIdx indicates the horizontal offset of the UV needed to sample the texture, and yIdx the vertical offset. Both values have to be divided by divisor in order to be in the usual [0; 1] range of UVs.
For example, suppose four 512x512 are packed together into a 1024x1024 texture:
| A (512x512) | B (512x512) |
|---|---|
| B (512x512) | C (512x512) |
If you ask for texture "B", then xIdx = 1, yIdx = 0, divisor = 2. In order to sample in the pixel shader we will need to do:
Only textures of the same format and resolution will be packed together, both in Desktop and Mobile. The Manager will automatically convert all RGB/BGR/ARGB/RGBA/BGRA/etc variants as ARGB (or ABGR depending on the platform's default) to avoid unnecessary limitations on the texture combinations that can be packed together.
When the texture is being loaded for the first time, the manager will try to insert it into the first available array/atlas it sees, or else create a new one. Several parameters affect the creation of the texture array/atlas, which can be configured in
Attention #1!
Automatic batching works 'on the fly'. You should load related textures together to prevent completely unrelated textures getting packed in the same array/atlas while the related ones end up in different arrays/atlas.
Since the ResourceManager parses folders in order, you should store all hlms material definitions classified by folders so that they get loaded closely and increase the chance of packing everything that is related together.
The texture types are like "profiles" of batching/packing configurations, and only apply for textures being loaded for the first time. The texture type is ignored when such texture has already been loaded, and beware that it may have been packed with different settings. If you need to load it with different parameters, see aliasing.
The following types are defined:
The reasons to have multiple profiles are simple:
PF_L8) even if the original is stored as a 32-bit RGBA PNG file. Furthermore, sRGB (gamma correction) is disabled for these textures.Desktop-only Hlms implementations already skip the use of TEXTURE_TYPE_DETAIL & TEXTURE_TYPE_DETAIL_NORMAL_MAP enumerations since they're only useful in Mobile; and use TEXTURE_TYPE_DIFFUSE and TEXTURE_TYPE_NORMALS instead.
The packing algorithm uses multiple criteria to determine whether it should pack or not a texture:
The comments and the code itself should be self-explanatory. The setting pixelFormat allows to force a conversion to a particular format. When left as PF_UNKNOWN, the texture's original format will be used (except for RGB/BGR/ARGB/BGRA/etc variations).
The setting maxTexturesPerArray controls the maximum number of textures that can be packed together. Note the actual number may be lower either due to hardware limitations (i.e. you can't make an uv atlas with 16 512x512 textures on a GPU that has a maximum texture resolution of 1024x1024) or due to the textureArraysTresholds parameter (which only applies on Desktop).
The parameters packNonPow2 and packMaxRatio operate under the assumption that such textures are rare and therefore should not be packed to prevent memory waste.
The setting isNormalMap should only be used for normal mapping: the manager will automatically convert unsigned formats [0; 1] to signed formats [-1; 1] except for the Z component (Blue channel).
There are cases where you want to load textures with different profiles. For example, you may want to load a normal map as a normal map (signed format) but at the same time allow viewing its raw contents as if you were to look at them with an image viewer (unsigned format). This is not common in-game, but very common within resource editors.
You achieve this via aliasing. Aliasing allows you to load the same texture twice (or more), under two different names; and therefore with different profiles. This is the definition of createOrRetrieveTexture:
The alias name is an arbitrary name and must be unique. The "texName" is the actual name of the texture to load. For example, we may want to load MyNormalMap.dds as a normal map, and as a raw texture:
Now the texture is loaded twice in the GPU. Set the datablock's texture to the name "As Raw Map" to view it, and the name "As Normal Map" to use it as a normal map.
Note that if you try to use the name "MyNormalMap.dds" in the datablock, you will load the texture again for a 3rd time; as this will create an alias "MyNormalMap.dds" to the texture "MyNormalMap.dds".
Aliasing is also useful when you've got textures stored on disk with a very technical name, but address them with a fancy, more user friendly name.
The user can design their own texture packs. The Manager will never try to modify them automatically.
The reasons to use texture packs are varied:
TBD
Incorrectly configuring the Hlms Texture Manager or having a messy Asset folder can easily cause weird crashes or cause GPU out of memory exceptions.
For example one single 4096x4096 texture at 32 bpp requires 64MB. A maxTexturesPerArray of 8 means that Ogre will attempt to request 512MB of consecutive GPU memory. This requires at least a 1GB GPU, and even then, it may not be possible due to fragmentation, staging resources, or even CPU-side virtual address exhaustion in 32-bit executables on 32-bit OSes.
To prevent this particular case, the textureArraysTresholds parameter will kick in; and will clamp maxTexturesPerArray to 1.
Nonetheless, special attention needs to be taken to ensure maximum occupancy of the each array.
The function HlmsTextureManager::dumpMemoryUsage is a powerful tool that will dump all loaded textures to the log in CSV format using '|' as separator for further analysis on MS Excel or OpenOffice Calc.
The following is an example of the dump's output:
You should copy the dump, open OpenOffice Calc, and hit paste. It will open a text import dialog. It's important that you select '|' as separator:
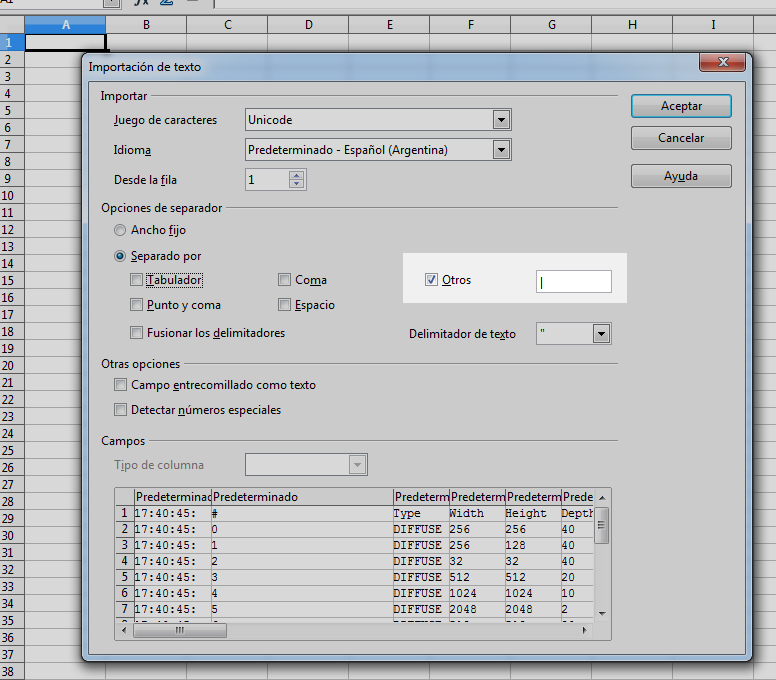
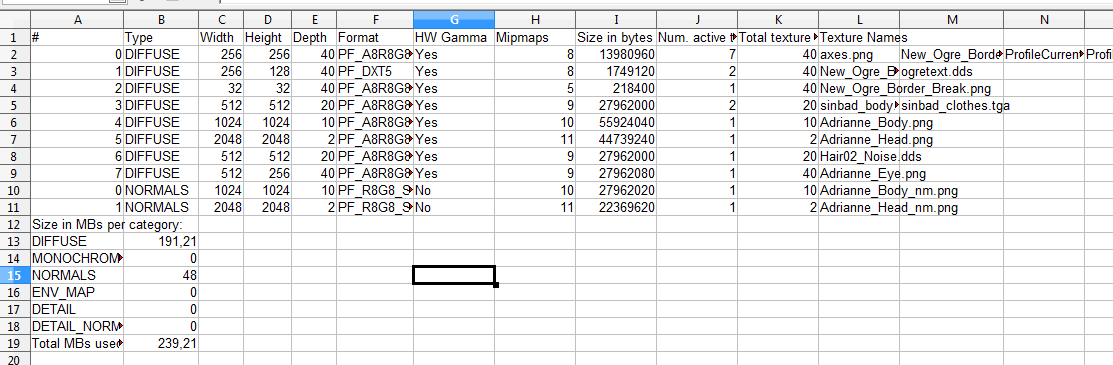
Once you hit OK, you should see the formatted output:
Now that you have it on spreadsheet, you can add more columns and perform additional useful statistics:
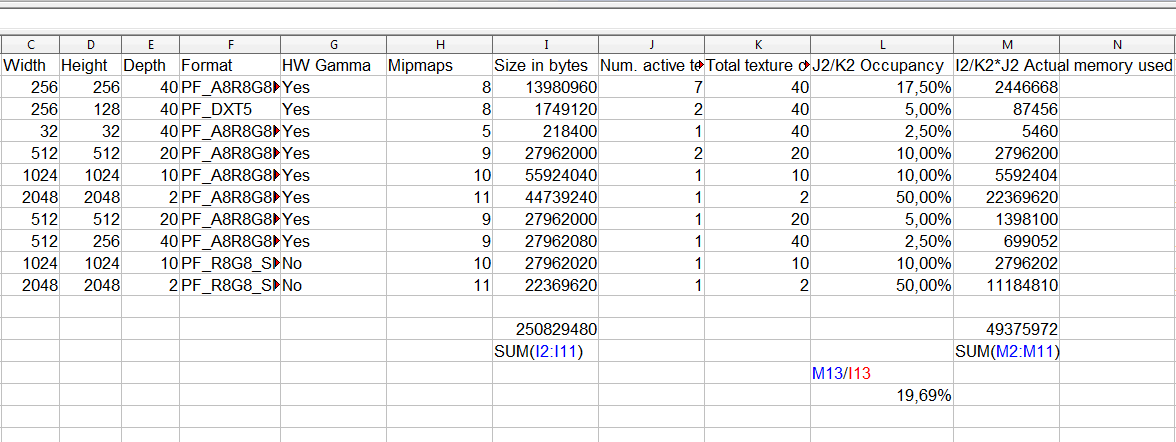
In this very simple example, we have very few textures thus heavily underusing the reserved space. We only use 19.69% of the memory the Hlms Texture Manager actually requested! That's just 47MB out of the 239MB.
You can also rely on autofilters and sort functionality (sort by biggest unused space first!) from spreadsheets to narrow down inefficiencies.
From this example we can gather:
DefaultTextureParameters. Real world applications won't usually have this problem though.The following is a more real-life example (edited):

We can gather:
D3D11 & GL3+ RenderSystems have slightly different strategies for uploading memory. This means that if your memory budget is very tight, one RS can succeed where the other can fail with an out of memory error.
Something to be aware of is that D3D11 doesn't support formats like A8 and LA88 textures (see D3D11Mappings::_getPF; those that return UNKNOWN) while OpenGL does; so the D3D11 RS tries to emulate them using an RGBA8888 texture, which is 2 to 4 times the original memory footprint. These subtle overlooks can cause D3D11 to consume significantly more memory. Fortunately this significant difference are often easy to see with Windows' Task Manager.
One way to fix this problem, if using Unlit shaders, is to use PF_R8G8 and using Unlit's shader with setTextureSwizzle( 0, R_MASK, R_MASK, R_MASK, G_MASK ).
Additionally, texture arrays mean that either the whole array is GPU resident, or no texture from the array is. Traditionally D3D11 & GL drivers keep track of which textures are needed for rendering. This made possible to load 1GB of texture data in a 256MB GPU without failing; because it isn't very common to use all 1GB at once in the same frame, thus the driver would page in and out what is necessary, leaving the rest in system RAM. This is known as residency.
Texture arrays make residency control coarser. As a result, packing unrelated textures in the same array will force the driver to keep these unneeded textures resident (e.g. Level A & Level X textures packed together), and this can result in more frequent out of GPU memory exceptions.
In the future Ogre should have its own residency control solution, particularly since it is needed by Vulkan & D3D12; but at the time being Ogre will naively try to load all textures. Suboptimal HlmsTextureManager settings can cause residency problems in OpenGL & D3D11, in addition to the waste mentioned in the previous section.
Although modern cards have >= 1GB of available GPU memory, there still has to be room for geometry and RTTs (Render To Texture). Remember to keep an eye on your memory consumption at all times.
pssm_lambda of 0.95 often gives good results, but this may vary per scene.HlmsManager::setShadowMappingUseBackFacesHlmsDatablock::mShadowConstantBias.PF_FLOAT32_R for rendering shadow maps until you get it to look correct. Then you can start worrying about lowering precision to get better performance.Sample_ShadowMapDebugging sample on how to debug shadows. Those techniques may give you useful hints about what's going on.[^12]: GL3+ and GLES3: extension ARB_sampler_objects. D3D11: ID3D11SamplerState
 1.8.13